Battery switch on travel trailer function is crucial for managing your RV’s power. Understanding how these switches work – whether it’s a simple 1-2-both switch, a disconnect switch, or a more complex combiner – is key to safely and efficiently using your trailer’s battery power. This guide will walk you through the different types, their applications, troubleshooting common problems, and best practices for maintenance and system integration.
We’ll cover everything from basic wiring diagrams and operation to advanced troubleshooting techniques and preventative maintenance. You’ll learn how to choose the right switch for your RV, extend its lifespan, and safely install or replace it. By the end, you’ll be confident in your ability to manage your travel trailer’s power system effectively and safely.
Understanding Battery Switch Functionality in Travel Trailers
Properly managing your travel trailer’s battery power is crucial for a smooth and enjoyable camping experience. A battery switch is the key to controlling this power, allowing you to isolate batteries, charge them effectively, and prevent accidental drain. Understanding its functionality is essential for every RV owner.
Types of Battery Switches
Travel trailers typically utilize one of three main types of battery switches: a simple on/off switch, a two-battery switch, and a battery isolator. A simple on/off switch is the most basic, providing only the ability to connect or disconnect the battery from the trailer’s electrical system. A two-battery switch allows you to select either the house battery, the starting battery (for the tow vehicle), or both.
Battery isolators, on the other hand, automatically manage power distribution and charging between multiple batteries.
Typical Wiring Diagram for a Battery Switch System
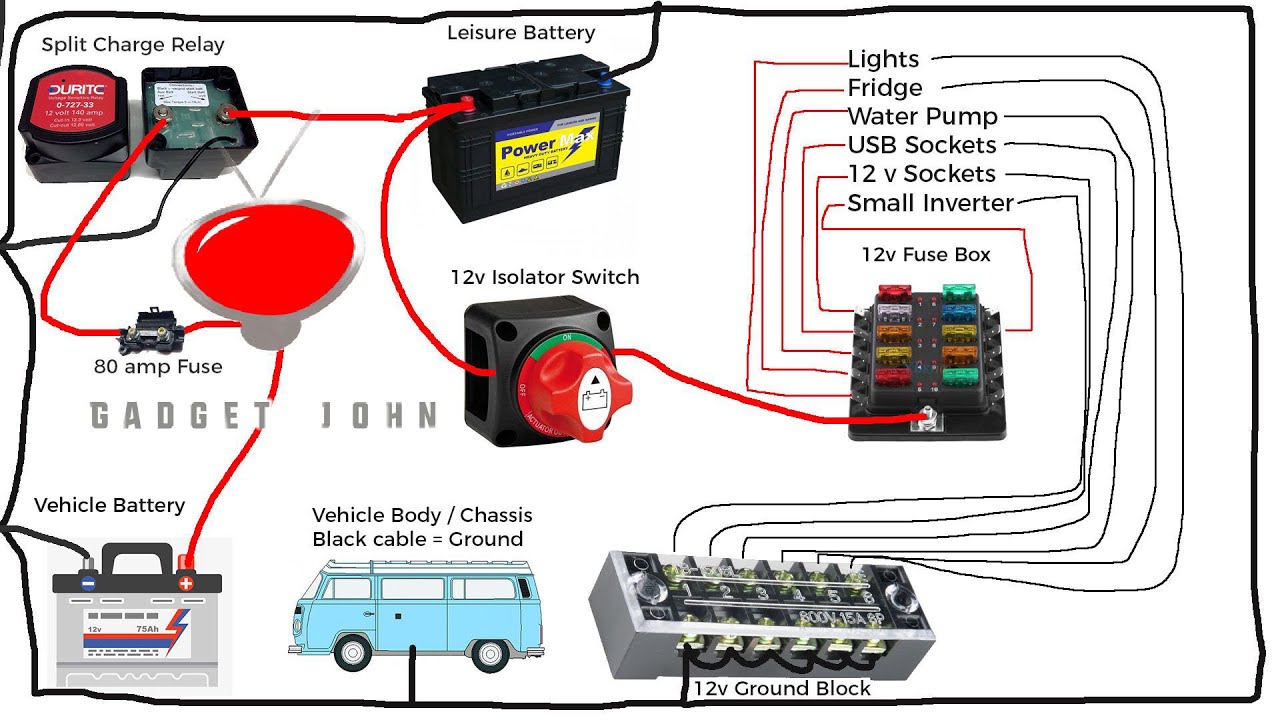
A typical wiring diagram for a two-battery switch system shows the house battery and the starting battery each connected to a terminal on the switch. From the switch, wires lead to the trailer’s 12-volt system, such as lights, water pump, and other appliances. A positive wire connects from each battery to the switch, and a negative wire runs directly from each battery to the chassis ground.
This ensures proper grounding and safety. An isolator system adds complexity, incorporating a relay and potentially a charging circuit for both batteries. A visual representation would show the batteries, the switch (or isolator), the various circuits drawing power, and the ground connection, all clearly labeled. The lines representing wires would indicate the flow of power.
Operating a Battery Switch
Operating a battery switch is straightforward, but understanding the position of each setting is critical. Before operating the switch, always ensure the vehicle and trailer are properly grounded. For a simple on/off switch, flipping it to the “on” position connects the battery to the trailer’s system. A two-battery switch usually has three positions: “house,” “both,” and “off.” The “house” position connects only the house battery, “both” connects both the house and starting batteries, and “off” disconnects both.
The isolator typically requires no manual operation; it automatically manages charging and switching based on voltage levels.
Advantages and Disadvantages of Different Battery Switch Designs
Simple on/off switches are inexpensive and easy to install, but lack the flexibility of more advanced systems. Two-battery switches offer greater control, preventing the draining of one battery by another, but still require manual switching. Battery isolators provide the most sophisticated management, automatically regulating charging and power distribution, but are generally more expensive and complex to install. Choosing the right switch depends on the individual’s needs and budget.
For instance, a simple camper might only need a simple on/off switch, while someone with a larger trailer and multiple batteries will benefit greatly from an isolator.
Battery Switch Types and Their Applications
Choosing the right battery switch for your travel trailer depends on your needs and setup. Different switches offer varying levels of control and safety features. Understanding their functions is crucial for managing your trailer’s power effectively and safely.
1-2-Both Battery Switch Functionality
A 1-2-Both switch is the most common type found in travel trailers. It allows you to select between using only your trailer battery (position 1), only your vehicle’s battery (position 2), or both batteries simultaneously (position Both). The “Both” position is typically used to charge the trailer battery while driving, using the alternator of your tow vehicle. This setup is simple and effective for most users.
Switching to position 1 isolates the trailer battery from the vehicle’s electrical system, preventing potential drain on the vehicle’s battery when the trailer is disconnected. Selecting position 2 prevents accidental discharge of your trailer battery.
Battery Disconnect Switch for Security
A battery disconnect switch acts as a master shutoff for your trailer’s electrical system. It’s primarily a safety feature, allowing you to completely isolate your batteries to prevent accidental drain or short circuits. This is particularly useful for long-term storage when you want to prevent the batteries from completely discharging, and it can also help prevent theft by disabling the trailer’s electrical systems.
The switch is usually a simple on/off toggle, providing a convenient way to secure your battery bank.
Situations Where a Battery Combiner Is Beneficial
A battery combiner differs from a 1-2-Both switch. It automatically combines the power from multiple batteries, usually for charging purposes. While a 1-2-Both switch allows manual selection, a combiner automatically merges the batteries when the vehicle is running and charging, and disconnects them when not charging to prevent draining. This is particularly beneficial in setups with more than two batteries or when using solar panels and other charging sources.
This prevents overcharging and ensures efficient charging from multiple sources without manual intervention. For example, a system with a deep-cycle house battery and a starting battery will benefit from a combiner, allowing the alternator to charge both simultaneously.
Maintenance Requirements for Battery Switches
Regular maintenance ensures your battery switches function reliably. For all types of switches, visually inspect the connections for corrosion or loose wiring. Tighten any loose connections and clean any corrosion with a wire brush and baking soda solution. For 1-2-Both switches and battery combiners, periodically check the switch’s operation to ensure it smoothly moves between positions and makes proper contact.
For battery disconnect switches, ensure the switch mechanism operates freely and makes a solid connection. Finally, lubricate moving parts with a suitable lubricant, following the manufacturer’s recommendations. Ignoring maintenance can lead to poor connections, increased resistance, and potential electrical issues.
Troubleshooting Common Battery Switch Issues
Dealing with a malfunctioning battery switch in your travel trailer can be frustrating, but systematic troubleshooting can often pinpoint the problem quickly. Understanding the possible causes and solutions will save you time and potential damage. This section will guide you through common issues and their fixes.
Troubleshooting a non-functional battery switch involves a logical process of elimination. Start by visually inspecting the switch and its connections, then move to more involved checks if necessary. Remember safety first – always disconnect the battery before working on any electrical components.
Battery Switch Troubleshooting Flowchart, Battery switch on travel trailer function
The following flowchart provides a step-by-step approach to diagnose problems with your battery switch:
Start -> Is the switch in the correct position? -> Yes: Proceed to “Check connections”. No: Switch to the correct position. -> Is the problem solved? -> Yes: End.
No: Proceed to “Check connections”. -> Check connections: Are all connections secure and corrosion-free? -> Yes: Proceed to “Test battery voltage”. No: Tighten connections and clean corrosion. -> Is the problem solved?
-> Yes: End. No: Proceed to “Test battery voltage”. -> Test battery voltage: Are both batteries charged? -> Yes: Proceed to “Check switch itself”. No: Charge batteries.
-> Is the problem solved? -> Yes: End. No: Proceed to “Check switch itself”. -> Check switch itself: Is the switch functioning correctly (e.g., using a multimeter)? -> Yes: Check wiring.
So, you’re planning a trip? Awesome! Before you jet off, remember travel insurance is key. Check out Aon travel insurance for comprehensive coverage. They’ve got you covered for everything from lost luggage to medical emergencies. And if you’re heading to somewhere tropical, consider browsing Aon travel insurance options specifically designed for island adventures.
Peace of mind is priceless, especially when exploring new places!
No: Replace the switch. -> Check wiring: Is the wiring intact and properly connected? -> Yes: End. No: Repair or replace wiring. -> End
Common Causes for Battery Switch Connection Failure
Several factors can prevent your battery switch from making a proper connection. Understanding these common culprits can streamline your troubleshooting process.
- Loose or corroded connections: Oxidation on the terminals prevents proper electrical contact.
- Faulty switch: The switch itself may be internally damaged or worn out.
- Broken or damaged wiring: Wires can become frayed, disconnected, or corroded, interrupting the circuit.
- Incorrect switch position: Simple user error can prevent power from flowing.
- Blown fuse or tripped breaker: A protective device may have interrupted the circuit due to an overload or short circuit.
Potential Problems and Solutions
This table Artikels common problems, their causes, solutions, and preventative measures.
| Problem | Cause | Solution | Prevention |
|---|---|---|---|
| No power to appliances | Loose battery cable connections | Tighten connections; clean corrosion | Regularly inspect and clean connections |
| Intermittent power | Corroded switch contacts | Clean or replace the switch | Use anti-corrosion spray on terminals |
| Complete power failure | Blown fuse or tripped breaker | Replace fuse or reset breaker | Avoid overloading circuits |
| No power to one battery bank | Faulty switch | Replace the switch | Choose a high-quality switch |
| Low voltage | Low battery charge | Charge the batteries | Regularly check battery voltage |
Safety Precautions When Working with RV Batteries and Switches
Working with RV batteries and electrical systems requires caution. These precautions are crucial to prevent injury or damage.
- Always wear safety glasses and gloves.
- Disconnect the negative battery terminal first before working on any electrical components.
- Ensure proper ventilation to avoid the buildup of explosive hydrogen gas.
- Never allow metal tools to touch both battery terminals simultaneously.
- Use insulated tools and avoid contact with exposed wiring.
- Consult your RV’s manual for specific safety instructions.
Battery Switch Integration with Other RV Systems

The battery switch isn’t an isolated component in your travel trailer’s electrical system; it’s a crucial link connecting your batteries to various power-consuming devices and charging sources. Understanding its interaction with other systems is key to preventing electrical issues and maximizing your RV’s power efficiency. This section will explore how the battery switch works in conjunction with your trailer’s charging system, inverter, and 12V/120V appliances, highlighting the consequences of a malfunctioning switch.
Battery Switch Interaction with the Trailer’s Charging System
Your RV’s charging system, whether it’s shore power (120V AC), a generator, or solar panels, ultimately needs to charge your batteries. The battery switch acts as a gatekeeper, determining whether the charging current flows to the batteries. When the switch is in the “on” position, the charging system can deliver power to the batteries. Conversely, if the switch is off, the charging system’s output is essentially blocked, preventing the batteries from charging.
This is a critical safety feature; it allows you to isolate the batteries from the charging system for maintenance or in case of a problem. A properly functioning switch ensures efficient charging and prolongs the lifespan of your batteries.
Battery Switch and Inverter Relationship
Inverter operation is directly tied to the battery switch. Inverters convert 12V DC power from your batteries into 120V AC power, supplying your household-style appliances. With the battery switch off, the inverter has no power source and cannot function. Turning the switch on connects the inverter to the batteries, allowing it to operate and power your 120V appliances.
A faulty switch might cause the inverter to shut down unexpectedly or prevent it from turning on, leaving you without 120V power.
So, you’re planning a trip? Awesome! Don’t forget travel insurance! Check out aon travel insurance for comprehensive coverage. They’ve got options for various trip lengths and activities. And if you’re heading somewhere tropical, aon travel insurance might have some specialized plans for those sunny getaways, making sure you’re covered for everything from lost luggage to medical emergencies.
Get a quote today and travel worry-free!
Battery Switch Impact on 12V and 120V Appliances
The battery switch controls the flow of power to both 12V and 120V appliances, though indirectly in the case of 120V devices. Directly, it controls the power to all 12V devices like interior lights, water pumps, and fans. With the switch off, these appliances will not function. Indirectly, the switch affects 120V appliances because their power source (the inverter) relies on the battery power that the switch controls.
Therefore, a faulty or improperly positioned switch can result in the complete lack of power to either or both types of appliances, regardless of whether the appliance itself is functional.
Impact of a Faulty Battery Switch on Overall RV Power Consumption
A faulty battery switch can significantly impact your RV’s power consumption, leading to unexpected drain or preventing proper charging. For instance, a switch that’s stuck in the “on” position might allow for continuous parasitic drain from your batteries even when the RV isn’t in use. This can lead to a completely drained battery bank. Conversely, a switch that’s malfunctioning and preventing charging will leave your batteries perpetually undercharged, resulting in shorter lifespan and potentially more frequent replacements.
This also necessitates the use of the generator or shore power more often, increasing your power consumption and costs.
Improving Battery Switch System Performance
A well-maintained battery switch is crucial for reliable power in your travel trailer. Choosing the right switch, performing regular maintenance, and knowing how to safely install or replace it will significantly extend its lifespan and prevent frustrating breakdowns on the road. This section will guide you through optimizing your battery switch system.
Selecting the Appropriate Battery Switch
The correct battery switch depends on your RV’s power needs and the number of batteries you have. Consider the amperage rating—it should exceed the maximum current draw of your appliances. For instance, a travel trailer with two group 27 batteries and numerous high-draw appliances might require a 200-amp switch, while a smaller camper with a single battery might only need a 75-amp switch.
Always check the manufacturer’s specifications for your RV and individual components to determine the appropriate amperage. The type of switch—rotary, rocker, or electronic—also matters. Rotary switches are common and durable, while rocker switches offer a more compact design. Electronic switches often provide more sophisticated control and monitoring features.
Extending the Lifespan of a Battery Switch
Proper use and maintenance are key to extending your battery switch’s lifespan. Avoid repeatedly switching between positions, as this can cause excessive wear on the internal components. Regularly inspect the switch for any signs of corrosion, loose connections, or damage. Clean the terminals with a wire brush and apply a dielectric grease to protect them from moisture and corrosion.
If you notice any issues, address them promptly to prevent further damage. Overloading the switch by drawing excessive current is a common cause of failure; make sure your wiring and components are correctly sized to avoid this.
Safely Installing or Replacing a Battery Switch
Installing or replacing a battery switch requires disconnecting the battery’s negative terminal first to prevent accidental shorts. Once disconnected, carefully remove the old switch, noting the wiring configuration before doing so. Install the new switch, ensuring all connections are secure and tight. Use appropriately sized wiring and crimp connectors for reliable connections. Always double-check your work before reconnecting the battery.
Consult your RV’s wiring diagram and the switch’s installation instructions for specific guidance. If you are not comfortable performing this task yourself, consult a qualified RV technician.
Preventative Maintenance to Avoid Battery Switch Malfunctions
Preventative maintenance is far simpler than dealing with a malfunctioning switch. Regular visual inspections, as mentioned earlier, are essential. Pay attention to any unusual smells (burning or electrical), sounds (arcing or crackling), or overheating. These are warning signs that require immediate attention. Testing the switch’s functionality periodically using a multimeter can help identify any potential problems before they escalate.
By following a routine maintenance schedule, you can significantly reduce the risk of unexpected battery switch failures.
Visual Representation of Battery Switch Components
Understanding the physical components of a battery switch is crucial for safe and effective use. This section will visually describe a typical battery switch, its connection process, variations in design, and typical installation within a travel trailer.
A typical battery switch, often found in RVs and travel trailers, is a relatively simple device, but its functionality is vital. It’s essentially a multi-position switch that allows you to select which battery bank (or combination of banks) powers your trailer’s systems.
Battery Switch Physical Components and Functions
Imagine a sturdy, usually metal, box roughly the size of a deck of cards. This box houses the switching mechanism. On the outside, you’ll see several large terminals, usually labeled clearly. These terminals are where the positive (+) and negative (-) cables from your batteries and your trailer’s electrical system connect. You’ll also see a selector switch—a lever or knob—that lets you choose different configurations (e.g., battery 1 only, battery 2 only, both batteries combined, or off).
Connecting a Battery to the Switch
Connecting your battery to the switch requires careful attention to safety and proper wiring. Always disconnect the negative (-) terminal first from any battery before connecting or disconnecting any wires.
- Identify the terminals: Locate the terminals clearly marked “positive (+)” and “negative (-)” on the battery switch. The switch should also have corresponding terminals labeled for the battery connections (e.g., Battery 1 +, Battery 1 -, Battery 2 +, Battery 2 -).
- Attach the positive cables: Using appropriately sized battery cables and connectors (usually ring terminals), securely attach the positive (+) cable from your battery to the corresponding positive (+) terminal on the switch. Ensure the connection is tight and free of corrosion.
- Attach the negative cables: Repeat the process for the negative (-) cable, connecting it to the corresponding negative (-) terminal on the switch. Remember, always work with the negative connections last to prevent accidental short circuits.
- Connect to the trailer’s electrical system: The switch also has terminals for connecting the positive and negative cables that feed power to your travel trailer’s electrical system. Connect these cables, ensuring a tight and secure connection.
- Verify connections: Before turning on the switch, visually inspect all connections to ensure they are secure and free of any loose wires or corrosion.
Visual Differences Between Battery Switch Types
Battery switches come in several configurations. The most common are single-battery switches (simple on/off), dual-battery switches (allowing selection between two batteries or both combined), and more complex switches that may incorporate additional features like battery charging control.
Visually, you might see differences in the number of terminals (more terminals for more batteries), the type of selector switch (lever, rotary knob, etc.), and the overall size and mounting style. Some switches are enclosed in plastic boxes, while others are housed in more rugged metal enclosures. Higher-end switches might include additional indicator lights or other features.
Battery Switch Location and Installation Method
The battery switch is typically located in a readily accessible location near the batteries themselves, often inside a dedicated compartment or box. This placement allows for easy access for switching and inspection. It’s usually mounted securely to a surface using appropriate fasteners, ensuring it doesn’t move or vibrate loose during travel.
Installation usually involves running appropriately sized battery cables from the batteries to the switch and from the switch to the trailer’s electrical system. Proper cable routing and securing are essential to prevent damage and maintain a neat installation. It’s often recommended to use appropriately sized fuses or circuit breakers to protect the wiring and the switch itself.
Mastering your travel trailer’s battery switch is a vital skill for any RV owner. From understanding the different types and their functionalities to troubleshooting common issues and implementing preventative maintenance, this guide provides a comprehensive overview. By following the advice provided, you can ensure reliable power, extend the life of your battery system, and enjoy worry-free adventures on the road.
Remember safety first when working with RV batteries and electrical systems!
FAQ Insights: Battery Switch On Travel Trailer Function
What happens if I accidentally leave my battery switch in the “off” position?
You’ll lose power to all 12V appliances and systems in your travel trailer. Your batteries won’t charge either, unless you have a separate charging system.
Can I use a battery switch from a different RV in my travel trailer?
Possibly, but it depends on the amperage rating and the wiring configuration. Always check compatibility before installation. Incorrect amperage could damage your system or create a fire hazard.
How often should I inspect my battery switch?
At least once a year, or more frequently if you notice any unusual behavior or smells.
My battery switch is making clicking noises. What’s wrong?
This could indicate a loose connection, a failing switch, or a problem with the battery itself. Inspect connections and consider replacing the switch if the problem persists.
